Español  |
English  |
Utilities provided by EasyMariaDB
EasyMariaDB provides the following utilities:
- Create a database
- Create a user
- Delete a user
- Change a user’s password (by an administrator)
- Assign permissions to a user
- Change own password
To access all utilities, except Change own password, it is necessary to log in with the username and password of an administrator. See Connection data
Connection data
When running any of the utilities, except Change own password, a dialog with two steps is displayed. The first step, common to all of them, is a dialog asking for the data for the connection to the MariaDB/MySQL server.
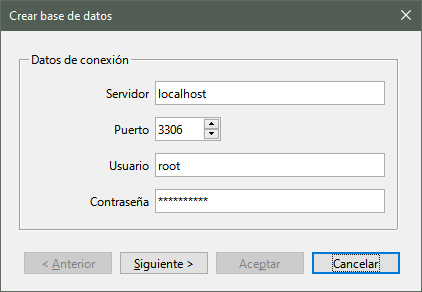
The data to be provided in this dialog are:
- Server: type the server name or IP address of the computer running the database server. If you are accessing from the same computer where the database server is installed, you can type localhost.
- Port: is the port through which the connection to the database server is made on the computer on which it is installed. The default port is 3306.
- User: the name of a user who has MariaDB or MySQL administrator permissions.
- Password: the password of the previous user.
| Top ^ |
Create a database
To create a database select the Tools > EasyMariaDB > New database menu, or click on the New database button on the EasyMariaDB toolbar or on the Extension tab, if you have configured the Tabbed user interface.
The New database dialog will appear. Fill in the connection data as explained under Connection data.
Click on the Next button. The second step of the dialog appears. Fill in the Database text box with the name of the database to be created.
Although you can enter any name, it is recommended that you do not use spaces, accents or other special characters (e.g. the letter ñ); it is also recommended that the name not be too long.
It does not matter if you write the name in upper or lower case, it will always be saved in lower case on the server.
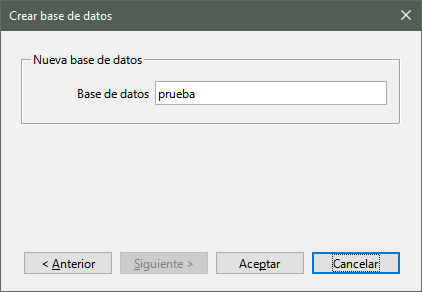
Once you have filled in the name, click OK.
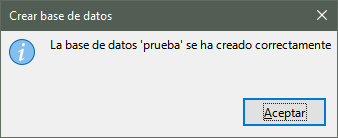
If all goes well, the database will be created and the following confirmation message will be displayed.
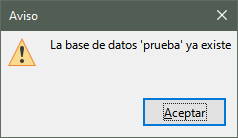
If the chosen name already exists on the server, an error message will be displayed.
| Top ^ |
Create a user
To create a new user, select the Tools > EasyMariaDB > New User menu, or click on the New User button on the EasyMariaDB toolbar or on the Extension tab, if you have configured the Tabbed user interface.
The New User dialog will appear. Fill in the connection data as explained in Connection data.
Click Next to display the second step of the dialog.
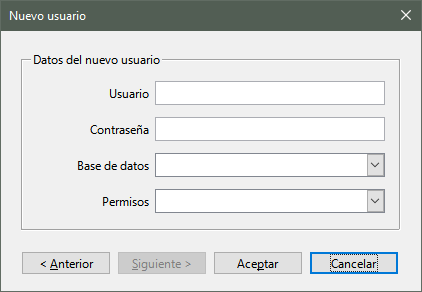
Fill in the dialog data as follows:
- User: type the name of the user to be created.
- Password: type a password for the user.
- Database: select the name of the database in which the user will have permissions. If you are creating an administrator user, you do not need to select a database.
- Permissions: select the permissions the user will have on the database selected above. The privileges of each of the different possibilities are explained in Assign permissions to a user.
| Top ^ |
Delete a user
To delete a user, select the Tools > EasyMariaDB > Delete user menu, or click on the Delete user button on the EasyMariaDB toolbar or on the Extension tab, if you have configured the Tabbed user interface.
The Remove User dialog will appear. Fill in the connection data as explained in Connection data.
Click Next to display the second step of the dialog.
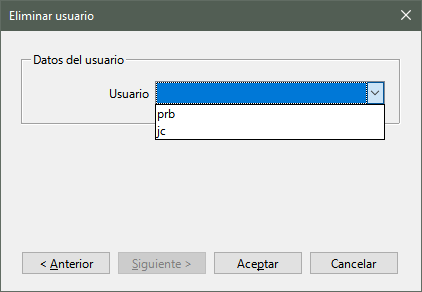
In the User field, select the name of the user to delete from the drop-down list.
Click OK. A new dialog will ask for confirmation.
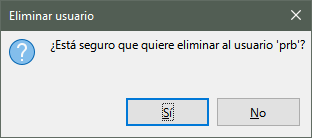
Click Yes in this new dialog to permanently delete the user. A message confirming the deletion will be displayed.
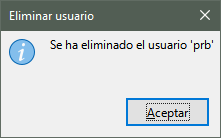
Click OK to close the dialog.
| Top ^ |
Change a user’s password (by an administrator)
Select the menu Tools > EasyMariaDB > Change user password, or click on the Change user password button on the EasyMariaDB toolbar or on the Extension tab, if you have configured the user interface On tabs.
The Change Password dialog will appear. Fill in the connection data as explained in Connection data.
Click Next to display the second step of the dialog.
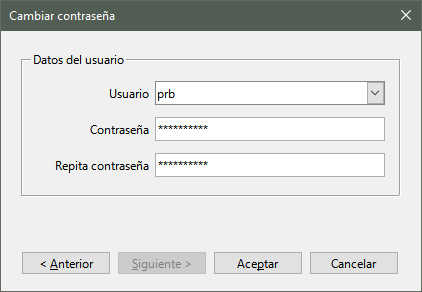
Fill in the dialog data as follows:
- User: select the name of the user whose password is to be changed.
- Password: enter a password for the user.
- Repeat password: retype the password for the user.
Once the data has been filled in, click OK to change the password.
A message will be displayed confirming the password change.

Click on OK to close the dialog box
| Top ^ |
Assign permissions to a user
Select the menu Tools > EasyMariaDB > User Permissions, or click on the User Permissions button on the EasyMariaDB toolbar or on the Extension tab, if you have configured the Tabbed user interface.
The User Permissions dialog will appear. Fill in the connection details as explained in Connection data.
Click Next to display the second step of the dialog.
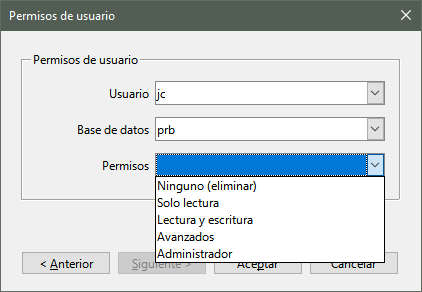
Fill in the dialog data as follows:
- User: select the name of the user to whom permissions are to be assigned or modified.
- Database: select the database for which permissions will be granted. If the permissions to be assigned are Administrator, it is not necessary to select a database.
- Permissions: select the permissions to be granted to the user.
Once the data has been filled in, click OK to confirm the change of permissions.
A new message will be displayed confirming the permissions change.
Click OK to close the message.
The permissions that can be assigned are as follows:
- None (delete). All permissions that the user has on the selected database will be removed.
- Read only. The user will be able to read the data in the database, but will not be able to modify it.
- Read and write. The user will be able to read data from the database and also modify it, but will not be able to create or delete tables or views.
- Advanced. The user will have all the permissions in the selected database, in addition to reading and modifying the data he/she will be able to create tables and indexes and perform other more advanced tasks, such as creating functions, triggers, etc.
- Administrator. All permissions on all databases and on the server. These are the same permissions as those of the root user, adding that he can log in from any computer on the network or even from iternet if the network has external access. These permissions should be assigned very carefully and the user who has them must carefully protect his password. If you have no problems logging in as the root user from the local computer, it is best not to assign it.
| Top ^ |
Change own password
While the other options can be executed from any LibreOffice application, this option can only be executed from Base and it is also required to be logged into the database to which the user belongs.
This is also the only option in which the dialog does not have a connection window.
Select the Tools > EasyMariaDB > Change Own Password menu, or click on the Change Own Password button on the EasyMariaDB toolbar or on the Extension tab, if you have configured the On Tabs user interface.
The password change window for the current user will be displayed.
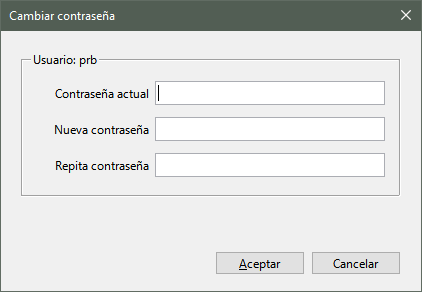
Fill in the data in the dialog as follows:
- Current password: type the password that the user currently has.
- New password: type the new password.
- Repeat password: retype the new password.
Once the data has been filled in, click on OK.
If everything is correct a confirmation message will be displayed.
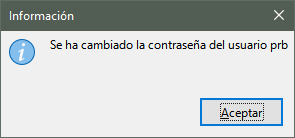
Click OK to close the message.
If there is an error, a message warning of the error will be displayed.
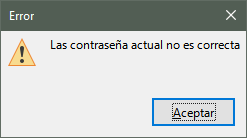
Click OK to close the message. Correct the error to continue.
The password change will not take effect until you restart LibreOffice. We recommend restarting immediately to avoid possible errors.
| Top ^ |
| < Create a database and connect to it | Index | EasyMariaDB help index |